Wednesday, 6 May 2015

Evaluation

Amaray Cover
Learning how to use Photoshop was great, I really enjoy learning new things, however I’m sure I have barely scratched the surface. But once I got past the point of learning I found it a bit tedious to use and time consuming. However it was made more fun by creating my game amaray cover.

I’m quite happy with the result of my cover in that I think the layout is good, it’s not too sparse or too busy. I don’t think I could improve much upon the back cover, I think that looks the best of all. However the front cover could have used some more work. Whilst the main picture of the man bowling fits nicely with the space background and the fence I feel that the pictures of the planets and the spaceship do not blend too well with the overall image. More work was probably required in terms of adding adjustment layers to these images to make them fit better in the overall picture.

This said it does give the game a feel of b-movie style in that it looks kind of low budget and developed by a company that is not well known for game production which is kind of what I was trying to achieve as the idea itself doesn’t take itself too seriously anyway.

Disc Label
I am very pleased with the disc label that I managed to produce. I think it looks clean and simple but without being boring. Simplicity was definitely the key here as an over fussy image would ruin the effect I was trying to achieve.

I also think the logo I created for the fictional game studio “Potato Games” is also really good and simple and I feel it encapsulates what I was trying to achieve in terms of the comedy element of this project.

Video
I found this to be the hardest stage of the project. Although I am pleased with the overall result of the video I feel that if more work went into it could be even better. I think I put too much at the start of the video which ate into my 1 minute limit which did not allow for more in game footage.


This is also an area I struggled with, because of the niche nature of the game idea I had I was limited to almost zero footage that I could use in making my video. This resulted in my having to make the game more about action and shooting just so I could make a video, however this added an ironic sense to the project which was in keeping with the comedy side of things. In the future I think I would pick a more realistic theme that would be easier to recreate in a video, like a football game, but at least I have some originality with this idea.

Finished Video and Exporting From Premiere

Now my video was complete all I had to do was save it and export it as an appropriate file type.

I did this by going to file, export then clicking media.

It then brought up a window where I could change the file type and settings associated with this. I chose to save the video as an avi file as this is a standard format that is compatible with nearly all media and video players.

I then clicked export and the file was saved.

Unfortunately I cannot upload the video to the blog as it is too big!


Transitions and Effects

When getting inspiration for my video I noticed that all the videos I watched used a transition effect between each scene that it changed to. This gave the videos a smooth feel and they weren't choppy.

At this point this is exactly how my video was, choppy and stutter, it didn't seem to transition well between clips, so I set about adding transitions.

There were a number of transitions available to me in Premiere however I only chose to use one as all the videos I watched seemed to use it plus I found it was the one that best worked for me, it was the dip to black transition.

In order to apply it to the video I clicked the effects tab in the project window, then opened video transitions, then opened the dissolve folder.

Then it was just a case of dragging and dropping the transitions where I wanted them on my timeline, which was between each clip.

By overlapping the transition across 2 clips it created a nice smooth flow for the video.

I wanted to add an effect to the space picture at the start of the video so it wasn’t a still image and it was as though the camera was panning across space. So I double clicked the image on the timeline to load it into the source window.

I then selected the effect controls tab.

From here I was able to apply the effect I wanted. I did this first by selecting toggle animation next to position.

Then using the positioning numbers I changed where the camera started on this picture and created a key frame.

Then I created another key frame at the end of the sequence with the camera in a different position, this meant that when played back it gave the impression of movement.

Titles

The next step was to add titles to the video in order to display all the text that I wanted.

This is when I started adding my titles to my title bin.


I started by clicking the title tab at the top of the screen and going to new title, default still.

This brought up the title creation window.

I then clicked in the window where I wanted to start typing and typed out the text I required.

I then used the selection tool from the toolbar to reposition the text where I wanted it to be.

Next I selected the font/ colour that I wanted. I wanted to use something that almost looks out of place and a bit sill in order to keep up the idea that this is not a serious game. So I used Hobostd Slant Gold from the title styles.

This would become the standard style I would use in my video for all the titles I created. I then repeated the previous steps to create all my titles and then moved them all into the title bin within the project window.

I then just dragged and dropped the titles onto the timeline. However I placed them on the track above the images where I wanted the text to appear.

I then just adjusted the length of time the text would appear by shortening its length so it would fit with the images.

Adding Audio

The next step was to add all the audio to the video and remove any unwanted sounds that were already attached to the clips used.

To start with I removed the unwanted audio that I did not need. This was on the video clip of bowls and also the game footage I had taken from the Mass Effect 3 video clips.

So in order to do this I right clicked on each clip and selected unlink.

This then separated the video from the audio track underneath it. This then meant I was able to select the audio track independently of the video, and delete it.

I then repeated this until all the unwanted audio was removed so I could add in my introduction sounds and backing track for the rest of the video.

The first audio I wanted to add was to the game studio logo I had added, potato games. In keeping with the fictional ethos of the company I wanted it to be silly and funny so I thought a duck quacking sound effect would be good.

So I went to freesound.org to try and find a duck quack sound effect that was suitable, but could not find one as most were recorded in the wild and had too much background noise. So I went to youtube and found a video of a world champion duck call instructor. Once I downloaded the video I was able to edit it in premiere.

Once I found the sound I wanted I marked in and out on the video to create a clip, I then inserted it onto the timeline, unlinked the video from the audio, deleted the video and then moved the audio into place on the audio track underneath the image. The image was longer than the audio so I adjusted the length the image was displayed so they fit together.

This took me down under a minute of footage but I just extended the final image of the video by a few frames.

Next I added some audio for the first few introductory seconds of the video. I wanted some music or sound effects that were dramatic and set the scene, to make the viewer think this was going to be something serious.

So I went back to freesound.org to try and find something suitable. I performed searched for violins and strings, but it was my search for cinematic that returned the audio that I desired, and so I downloaded a cinematic sound effect.

Once loaded into premiere I cut this audio clip down using mark in and mark out and inserted it onto the timeline. The just tweak image length to get it to fit the video and to keep the video to a minute in length.

I had to put the introduction audio on a lower track as it overlapped with the explosion sound effect and I wanted both to be present.

Now that was the introduction to the video sorted I just needed to add the backing track to the rest of it.

I wanted some music that was in the metal sort of genre to add a gritty feel to the video and compliment the action footage in the video. I already had a piece of music in mind whilst I was creating this and that was the theme tune to the video game Doom 3.

I managed to find a video on youtube that had the song on it, so I downloaded the video in mp4 format and loaded the video, from the video clips bin, in premiere. The beauty of using this song is that there is a break in the music, just before the main instrumental, 43 seconds into the track, so this was a great point for me to mark in.

All I needed to do then was to insert this onto the timeline, without marking out as I would just adjust the length of the audio clip to fit to the end of the video.

First I had to unlink the video, from the Doom 3 theme, from the audio and then delete the video. The use ripple delete to remove any gaps it created.

Then like I say I just reduced the length of the audio clip, on the timeline, so that it fit the length of the video. This however meant that the music ended abruptly when the video finished, so to combat this and refine it I faded the music out.

To do this I selected the pen tool from the tool bar next to the timeline.

I then clicked 2 points on the audio track, one a few seconds short of the end and the one right at the end.

I then selected the selection tool from the tools.

I then hovered over the point I had created, with the pen tool, at the end of the audio track. I clicked and held the point and dragged it down in order to create a gradual fade in the volume.


Thus creating a more refined ending to the video.

Cutting Down To Size and Ripple Delete

Now I had the basis for my video, all video and images had been added to my timeline. However the video, as it stood was 1 minute 13 seconds and 2 frames long so I needed to cut it down to the desired minute mark.


I employed a couple of techniques to accomplish this. To start with I adjusted the scroll bar at the bottom of the timeline in order to expand the size of the clips. This magnified any gaps there were between the clips.

I was then able to right click in the gaps between clips and select ripple delete in order to close them.


I then resized some of the still images, I had used, so that they did not take up as much time on the timeline. I did this as opposed to editing the video footage as I was happy with the footage I had and did not want to change it. I then used ripple delete to close any gaps that this method created on the timeline.

This then gave me a nice round minute of footage.

Video Editing

Its now time to start editing the video clips and images I’m going to use and add to the timeline. Naturally I started with the opening sequence of the video which included the pegi 18 age rating, Xbox branding and game studio logo I created.


So first I double clicked the video clip, in the video clip bin in the project window, so it would load into the source window for editing. I found the pegi 18 video on YouTube and downloaded it from there as an mp4 file in order to get the highest quality possible.


This particular clip was over 4 seconds long. All I needed from it was the audio and the image and the audio stopped after 2 seconds. So with this in mind I cut the video down in length using the mark in and mark out tools.

Now that the clip was the length that I wanted it I just clicked the insert button in order to add it onto the timeline.

The next clip to add to the timeline was the xbox branding, so once again I loaded it into the source window by double clicking it.

This clip had 17 frames of nothing at the start of it so using step forward/ back 1 frame button I got the clip to a point where the video and audio actually started. Once at the correct point I marked in. The video clip also had about 5 seconds where the audio had finished and there was no more animation in the video, so again using the step forward/ back 1 frame button I got it to the point where the audio had just finished and marked out.

Now my clip was the right length I added it to the timeline with the insert button.

The next step in this preliminary part of the video was to add the game studio logo, that I had previously created in illustrator, to the timeline. This was a simple process as I just dragged and dropped it from the images bin onto the timeline.

The image as it was took up a lot of time and frames on the timeline, however I left it as it was as if I overran the 1 minute run time this is something I could reduce in order to meet my target without having to pull any of my video.

Next in the sequence is the introduction of the game. This starts with an image of space, so again dropped the image of space onto the timeline from the relevant bin in the project window.

This was to be followed by some footage of bowls.

I found some footage on youtube of a bowls game being played so downloaded it. This could be found in the video clips bin I had created. I double clicked the video in order to load it into the source window so I could edit it. I watched through the footage to find some bowls action that I wanted to used and then proceeded to mark in and out around the clip I wanted and inserted it into my timeline.

As you can see in the above image the video does not fit the size of the pane in the sequence playback window, and subsequently does not match the size of the other footage so far. In order to remedy this I double clicked the image and expanded it to fit manually.


Although this remedied the problem it created another one as some of the quality is lost on this particular clip, but in a way I think it works as it fits with the way this game mocks lawn bowls.

Next I added the explosion that would serve as the background when the title flashed up at the end of the intro. This was a quick step as I only had to trim a couple of frames off at each end of the video.

This took me up to the 30 second mark in the timeline so far, which is quite a lot considering I only have a minute to work with but I was not worried as I had left the previous images that could be shortened at the end.

Now I started to add some game footage. Going back to what had been said previously in the blog, this game was going to be more about action and shooting than bowls, as per the “20% more guns 80% less bowls” on the back of the amaray game cover.

With this in mind I sourced my footage from youtube. I wanted some game footage of a sci-fi shoot em up type game and found that from clips of Mass Effect 3 game footage. There were 2 videos in particular that suited my needs. One was a trailer for a DLC package and the other was a video of some multiplayer gameplay that someone had recorded. So I downloaded them in mp4 format and began editing them.

I took 3 clips from the first video, the video of the DLC trailer and added them to my timeline.

I then added 2 clips from the multiplayer footage.

To finish the sequence I added the picture of my game cover that I had previously created in photoshop. I had to load the file in illustrator though in order to save it in a format whereby it could be loaded into premiere and used on the timeline.

Creating Bins and Importing


Now I’m good to go with creating the video and the first thing I wanted to do was add all the images, branding, audio and video to the project.

I started by creating a new bin in the project window to store all the images in. I did this by right clicking and selecting new bin. This will allow for better organisation as I work through.


Once created I renamed the bin “Images” and right clicked on it and began importing the images I needed for the sequence.


Once done I then created a further 3 bins for video clips, audio and titles and then imported all the relevant files I needed for each bin apart from the title bin as I would not add these to the timeline until I had laid down the video


.

Now I could start adding video and audio to my timeline.

Design and Creation of Promotional Video


Video Design/ Ideas

The final stage of the project is to design and create a one minute promotional video to accompany my fictional game, I would need to use Adobe premiere to create it.

I started out by watching some trailers for other video games, on youtube, to give me an idea of what content and structure I should use. Below are some links to some of the videos I watched.


Having watched these examples of game trailers it gave me an idea of how to structure the video in terms of its content, music and effects. All the videos have a backing track that is in sync with the video. Also they use transition effects to move through the footage.

With the idea I have for my project, a sci-fi style bowls game, it would prove difficult to make a video with footage of bowls game play as there hasn't been one made. Unlike if I was to make a football game there is plenty of stock footage out there that I could use. This is why I decided the game would be more of an action game than a game about bowls which adds an element of irony to the video and theme and is in keeping with the light hearted nature of the game. This would help me in the process of making the video as there is plenty of footage out there of sci-fi style action games.


With this in mind I set about designing a short storyboard of how my video will go.


The video will start with the pegi 18 age rating followed by the Xbox branding then the game studio logo. Having watched videos for other games they tend to follow this patter, whether the images are at the start or the end of the video.

As an introduction I would have an image of space with the words “Do you love space?” transitioning into an image of bowls with the words “Do you love bowls?” the video will then cut to the title of the game. I will then follow this up with footage of gameplay and at intervals have title on screen saying things about gameplay, character, levels and possibly weapons
.
At this point I am ready to start creating my video in Premiere.


Thursday, 30 April 2015

Design and Creation of DVD Label


DVD Disc Label Design


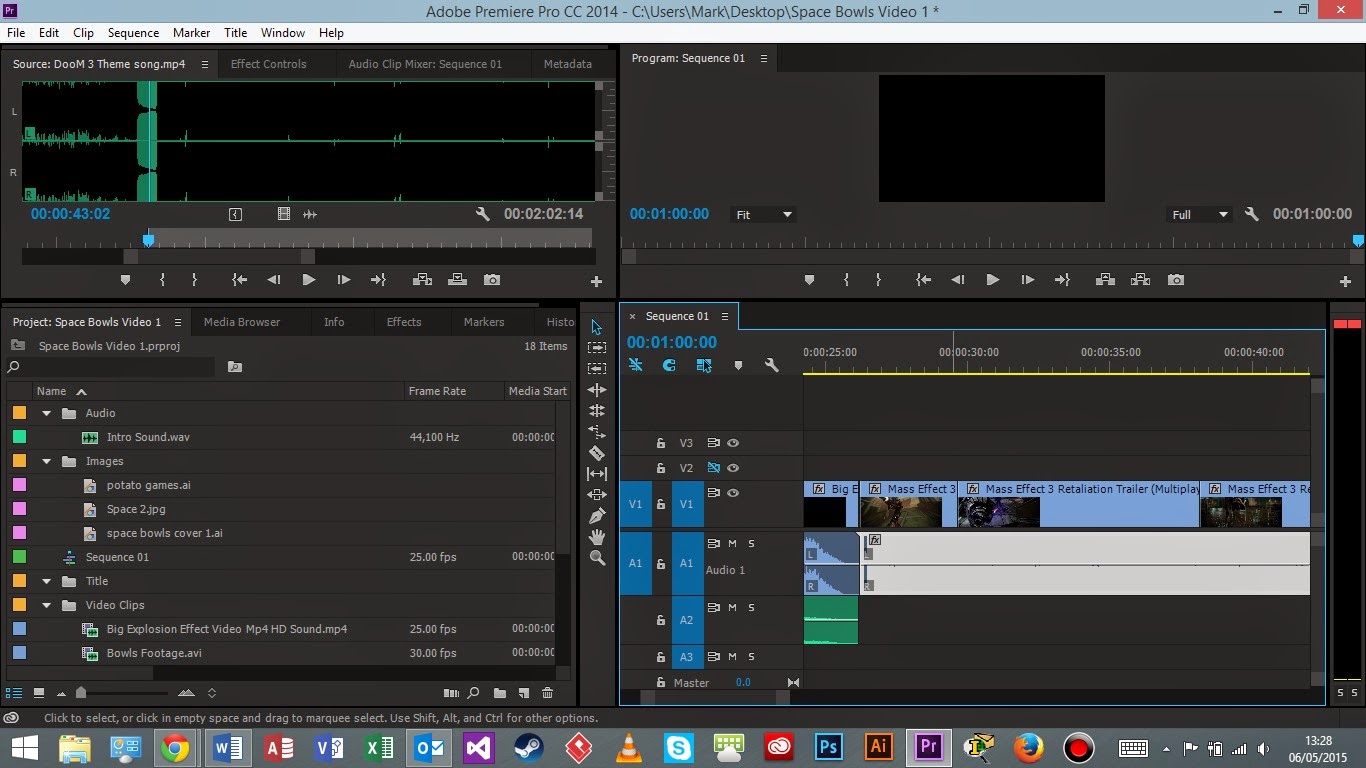
The next step in the assignment was to create the DVD disc label using Adobe Illustrator. To get an idea of layout and inspiration for my design I looked at some examples of Xbox 360 game discs. Here are a couple I looked at.


They show that the Xbox branding is compulsory across the top along with an esrb or pegi rating along with the game studio logos and any other relevant logos. Then the background is made up from images relating to the game/ theme of the game.

I also used a dvd template in order to measure out the correct size for the image.


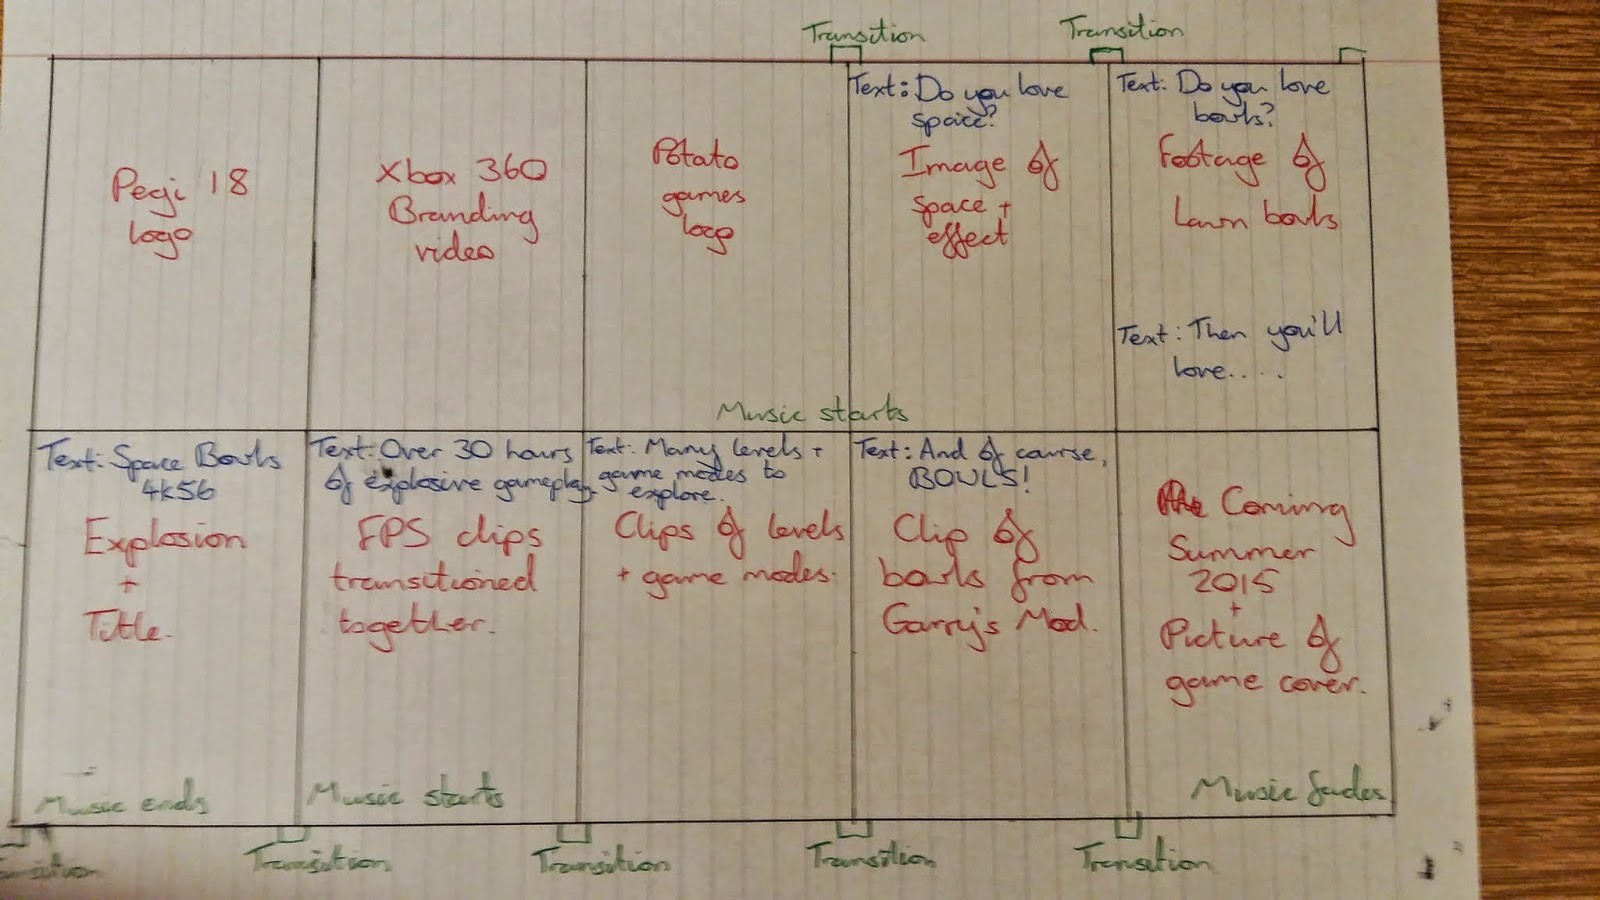
With this in mind I came up with the following design.


Now I was ready to start creating the image in illustrator
.
Creating the Disc Label

To start with I had to set up the correct artboard in illustrator with the correct size, colour and ppi so it would be printed to a good quality. I made the artboard slightly larger than the size of the disc as this would not affect the end result. Here is a shot of the settings used.


Now that my artboard had been created I needed to set out some guide lines. These included the bleed edge, the edge of the disc and the two inner circles of the disc. To do this I used the ellipse tool, with stroke set to black, then by double clicking I was able to specify the exact size of circle I would need. Once I had created each circle I aligned them all with the central point then clicked each one individually and selected make guide in order to turn them all into guides.


Next I need to create the main background image of the whole disc and I would do this using a picture of a bowl which turned out to be quite useful as it was a nice rounded shape.

I started with the below stock image of some bowls that got from the internet.


Once this was loaded onto a new artboard in illustrator I got to work on it. To start with I did not want to use a plain image of these bowls so I used the image trace tool to add an effect to the image, I having tried the 3 colour, 6 colour and 16 colour image trace I preferred the 16 colour trace so applied this to the image as you can still see quite a bit of detail of the bowl but it gives it a cartoon effect which I thought looked good.


Next the image needed vectoring in order to edit and work with properly, so I then clicked the expand tool in order to separate the image out into it’s individual elements.


At this point each individual item was still grouped together so the whole image still acted as one to to be able to remove individual elements I ungrouped the selected items through the object menu, then I deleted out all the bits I did not want leaving me with just one bowl.


This gave me a good round image that could be imposed over my DVD outline. I was not worried about the blue at the top of the image as this would be covered by the Xbox branding. So I once again grouped it all together through the object menu, so it could be moved easily and placed it onto the main artboard.

Once placed into the centre of the guide circles I was able to resize the image to fit within them better. I did this whilst holding shift and alt in order to retain the quality and aspect ratio of the image.

Then I used the ellipse tool, with fill set to white, to cut out the central hole of the disc. I did this by lining up with the central point on the artboard then holding shift and alt drew a circle to fit the inner guide.


Next I needed to add on the Xbox disc logo. And I did this using an Xbox disc image I found on the internet.


Once loaded on a separate artboard in illustrator I use the pen tool to create a selection area around the the part of the image I needed. I had the fill and stroke set to transparent so I could see what I was doing and also so there was no outline around my selection. I drew a triangle with the pen tool then whilst holding shift I curved the lines to fit the edge of the image. Once this was done I used a clipping mask to make a cut out of the Xbox logo I wanted.


This method work OK for me however the edges were not perfect.

Once this was done I placed the image onto the main artboard and resized it to fit the top of the disc label (again holding shift and alt).

I then used the ellipse tool to draw a transparent circle around the edge of the image, not the bleeding edge. I the created a clipping mask in order to tidy the image up where it had crept into the bleeding edge, this gave it a more refined look.


Next I added the pegi 18 logo to the image. I did this by using the image I had previously used on my amaray cover and loaded it in illustrator. I did this by directly placing the image onto the artboard and rezising it whilst holding shift and alt.


Then I went on to create the logo for the fictional game studio that my game was produced by. My idea was to call it Potato Games so that it was in keeping with the humorous side of the project. So naturally I started with an image of a potato I found on the internet.


I loaded this onto a new artboard in illustrator and set to work. I started with the image trace tool, and again used the 16 colour image trace as this was an effect that I liked and thought looked good.


Once done I was able to expand the image to separate it out into individual items, which meant I was able to then delete the white background, once I had ungrouped the selection, leaving me with an image of just the potato.

Next I added the text. I did this using the type tool so I clicked an area outside of the image of the potato and typed the text out onto 2 lines. Once done I played around with the font styles until I found one that I liked. This done I moved the text over the image of the potato then changed the font size until it fit nicely. Then I grouped it together with the image of the potato.


This was now my completed logo for my fictional game studio, so I dragged and dropped it onto my main image and resized it to fit.


Unfortunately when I did this the software created 2 extra symbols next to the text on my game studio logo which I was unable to get rid of which was rather frustrating.


All that was left to do was add the title, so using the type tool I added it in just below the xbox branding. I set the fill to black and the stroke to blue then changed the font until I found one I liked.


And there you have it, below is the final render of my dvd disc label for space bowls.